How to Edit Interview Audio in a Free Online Editor
Make the cuts first, repair only the sections that need it, then check the level. This walkthrough edits a short practice interview in our browser editor, with every step shown and the result exported from it.
By the fix.fm team · Published · Updated
Cut first, repair second, check last
An interview edit goes faster in a fixed order. Decide what stays and what goes, then repair the problems that remain, then check the level of the finished piece. Repairing a section you later delete wastes time, and deleting after repair can leave a join between a cleaned part and a raw part.
This walkthrough uses a 25 second practice interview that you can download and open in the free audio editor. Every screenshot below comes from that editor, on this file, in the order shown. The finished MP3 is the one the editor exported at the end.
The same short interview before and after the edits below. No autoplay. Use headphones at a comfortable level.
Before: the raw take
A false start after the question, a long pause, then hiss under the second half of the answer.
After: exported from the editor
The false start is gone, the pause is shorter, the hiss is reduced and the follow-up has a short fade in.
Built from two public-domain LibriVox readings with an added pause and simulated hiss, so you can download it and follow along. The after file is the MP3 the editor exported at the end of this article.
The raw file has four things wrong with it, placed where you can find them:
| Time in the raw file | What you hear |
|---|---|
| 0:00 to 0:06 | The host asks the question |
| 0:06 to 0:08.5 | The guest starts an answer, stops, and starts again |
| 0:08.5 to 0:10 | A 1.5 second pause |
| 0:10 to 0:21 | The answer. From 0:14 on, hiss sits under the voice and in the gaps |
| 0:21 to 0:25 | The host follows up |
The voices are two public-domain readings from LibriVox Short Story Collection Vol. 107, joined with an added pause and simulated hiss. Our fixture tests rebuild the file from those recipes, so the problems are exactly where this table says.
Import and listen once
Drop the file on the editor or choose it with the button. Decoding happens in your browser; nothing is uploaded. The whole file appears as one clip on Track 1, and the footer shows the format the editor decoded it to, here 44100 HZ and MONO.
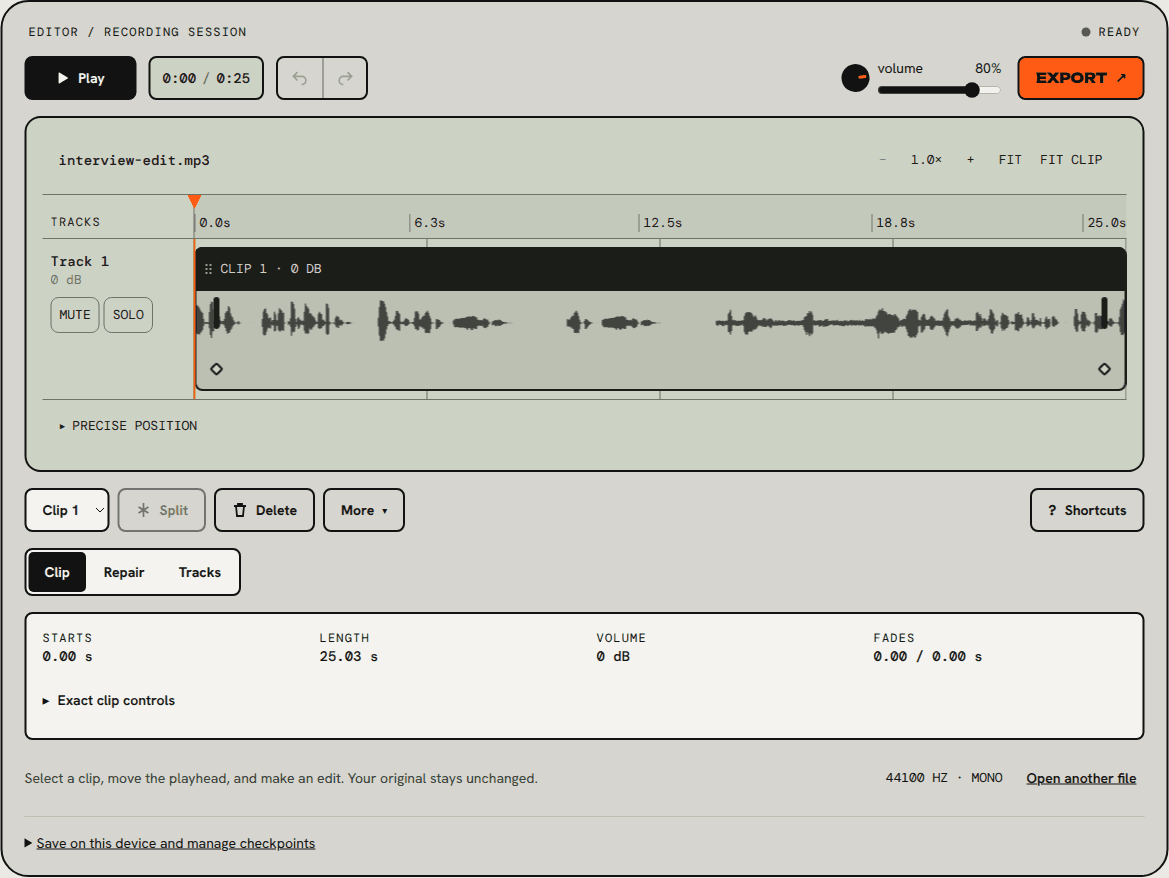
Play it through once before cutting anything. Note the time of each problem as you hear it. The ruler and the time readout are enough for this; precise numbers come later from the selection.
Remove the false start and close the gap
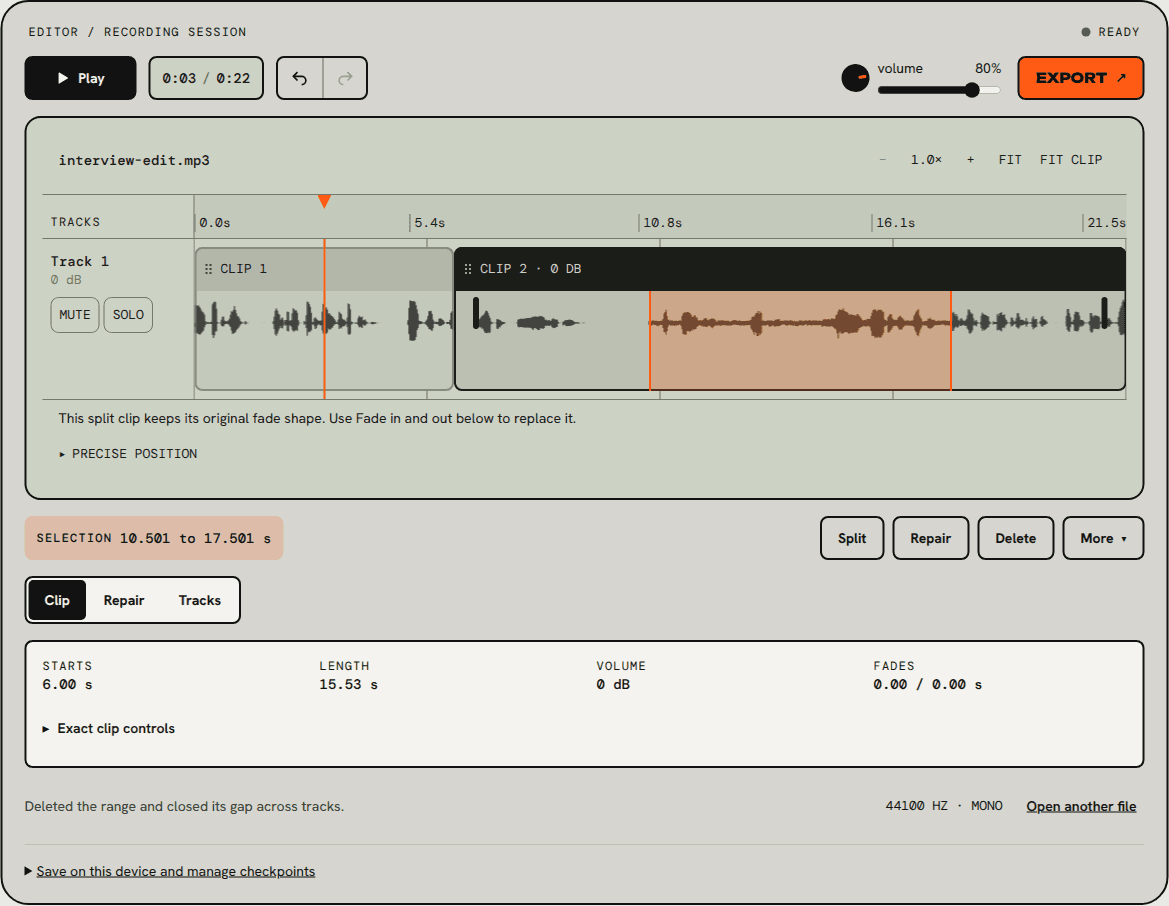
Drag across the waveform from about 6.0 to 8.5 seconds. The selection turns orange, the readout shows its exact edges, and four buttons appear for it: Split, Repair, Delete and More.
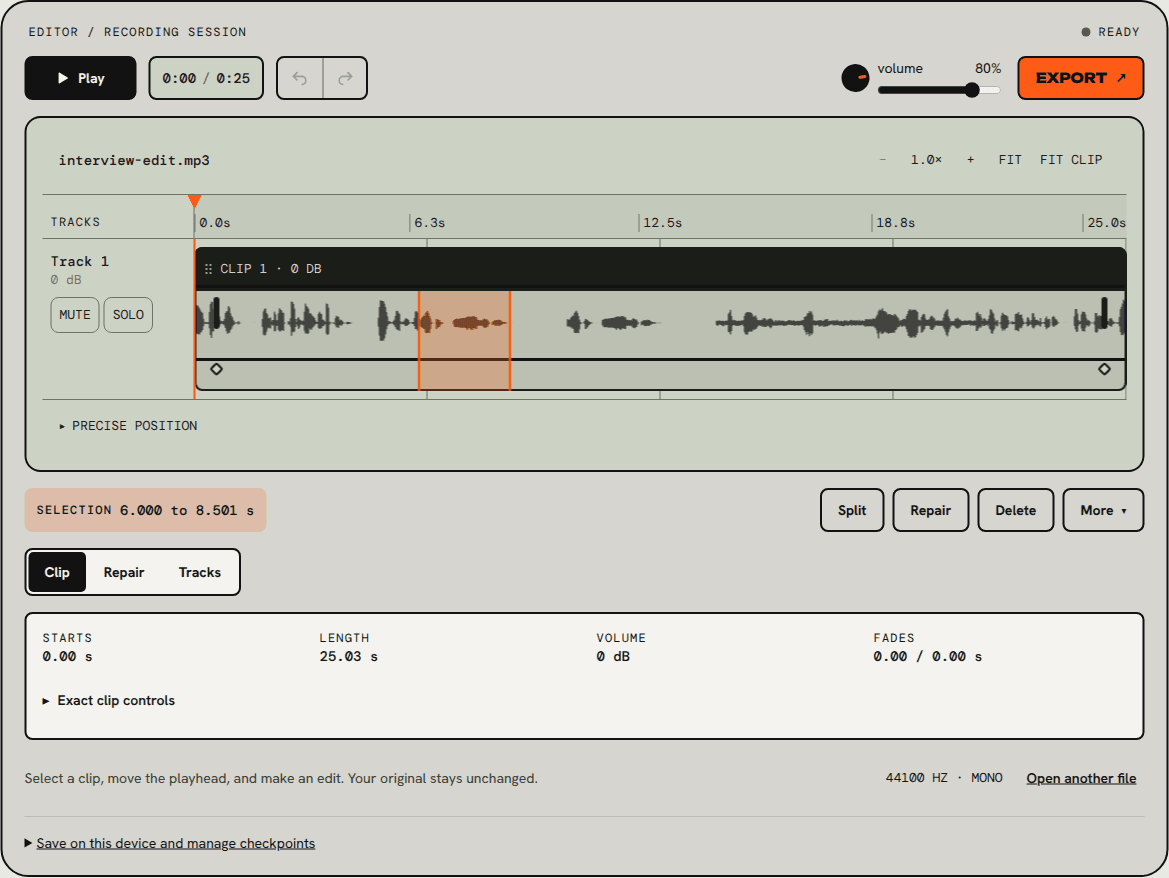
Press Split (or the S key) to cut at both ends of the selection. The false start is now its own clip. Select that clip and open More, then choose Delete, close gap. Everything after the cut moves earlier to fill the hole. The project drops from 0:25 to 0:22.
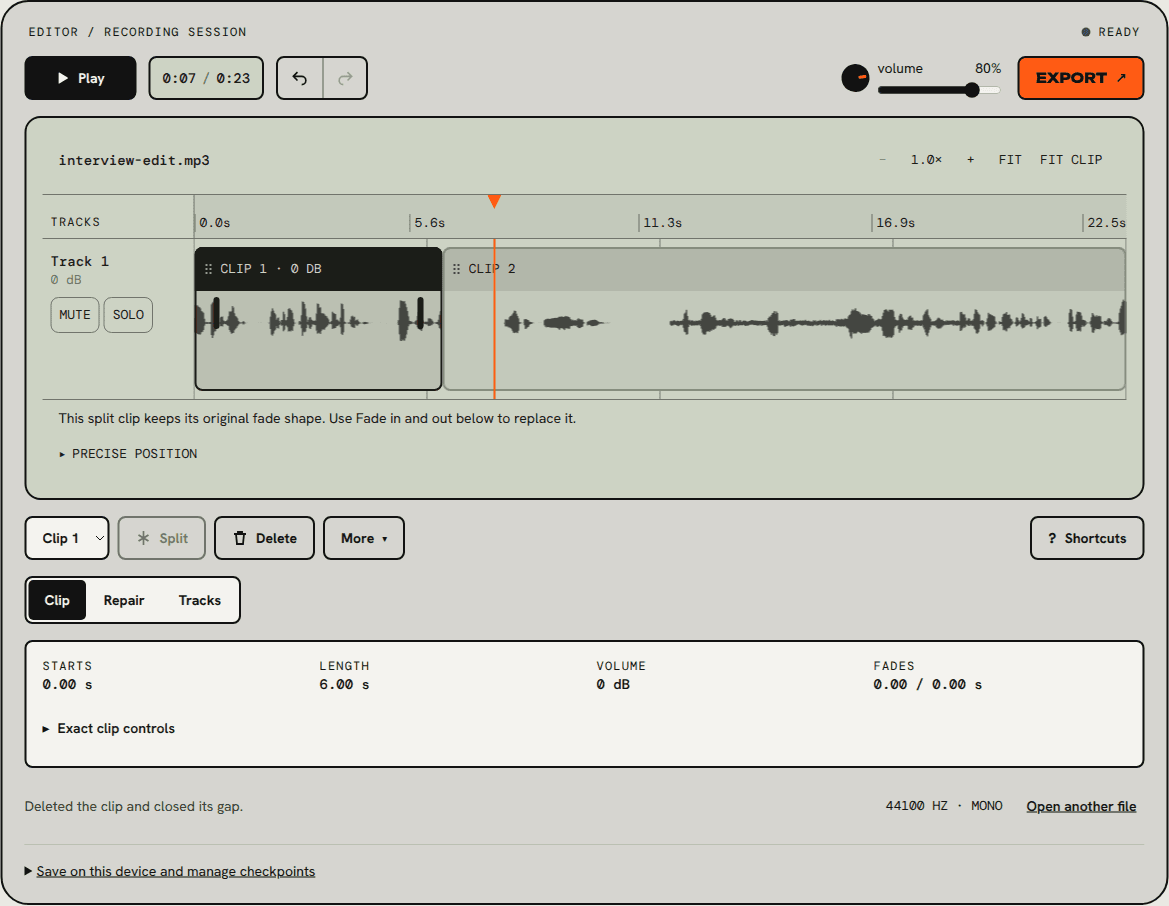
Plain Delete does the opposite: it removes the sound but leaves the gap, so later clips keep their timing. Use that version when something else is locked to the timeline, such as a video track or a transcript with timestamps. For a stand-alone interview, closing the gap is what you want almost every time.
Shorten the pause without losing the breath
The 1.5 second pause now sits at 6.0 to 7.5 seconds, right at the start of the answer. The first instinct is to delete it all. We did, to show what happens: select 6.000 to 7.500, open More and choose Delete range, close gap.
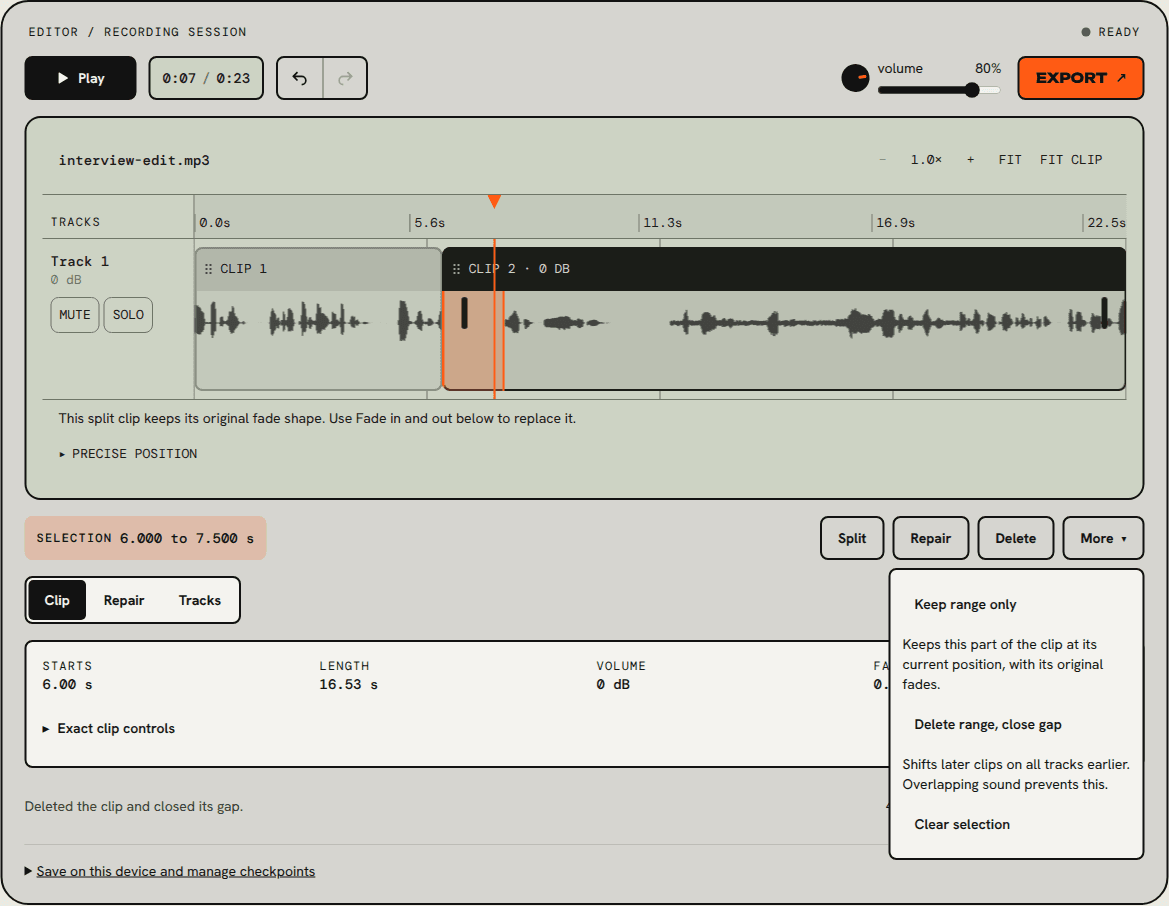
Play across the join. The answer now starts the instant the question ends, which sounds like an interruption rather than a reply. Press Undo (or Cmd/Ctrl+Z). The clip returns to 6.00 seconds and its full 15.52 second length, and the status says so.
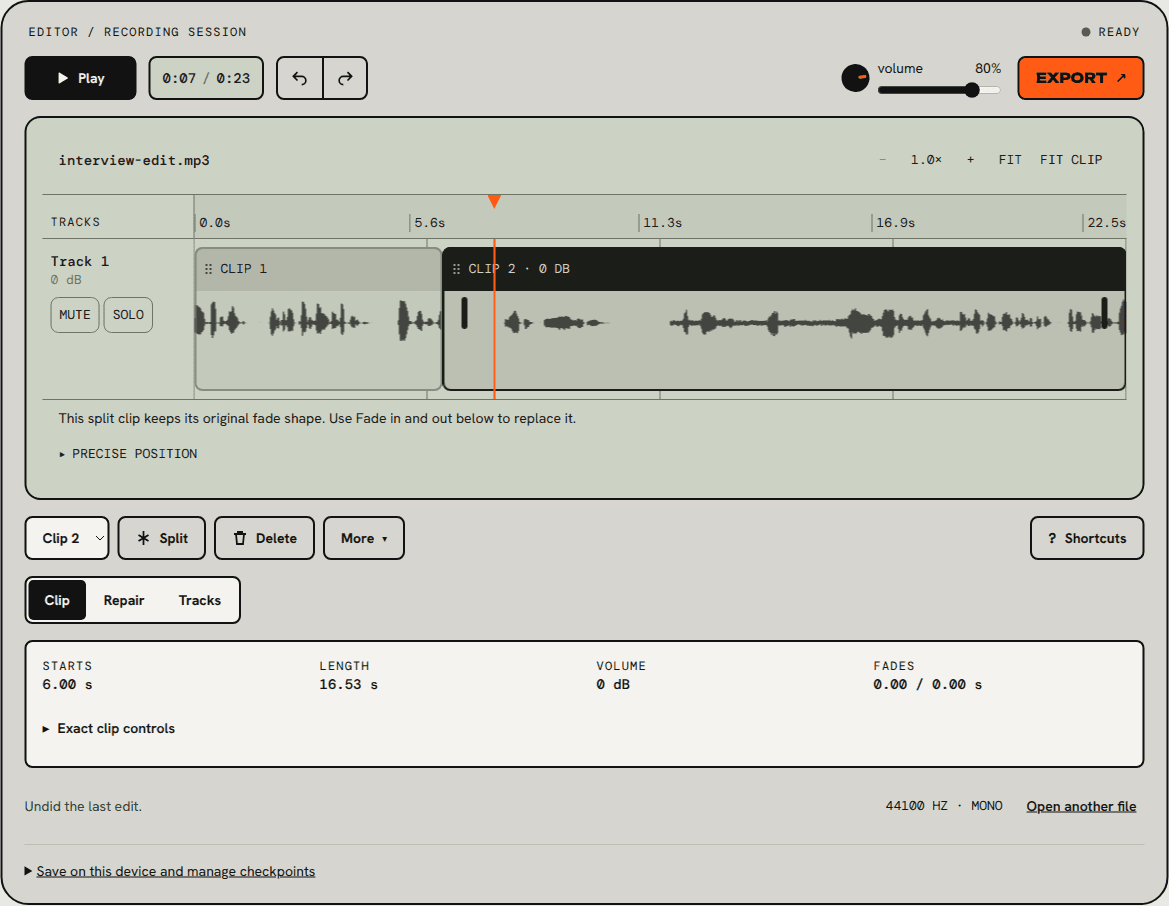
Then take the smaller cut: select 6.000 to 7.000 and delete with close gap. Half a second of room remains, which reads as the guest taking a breath before answering. The amount is a judgment call; the rule is to listen across the join after each cut, and to prefer leaving too much pause over too little. The same thinking applies when a tool proposes cuts for you, which the pause review article covers in more detail.
Repair the hiss on a selection, not the whole file
The hiss starts under the second half of the answer. Select it, here 10.501 to 17.501 seconds, and press Repair. Repairing one section explains what the editor does at the edges of a selection and when a whole-file fixer is the better choice.
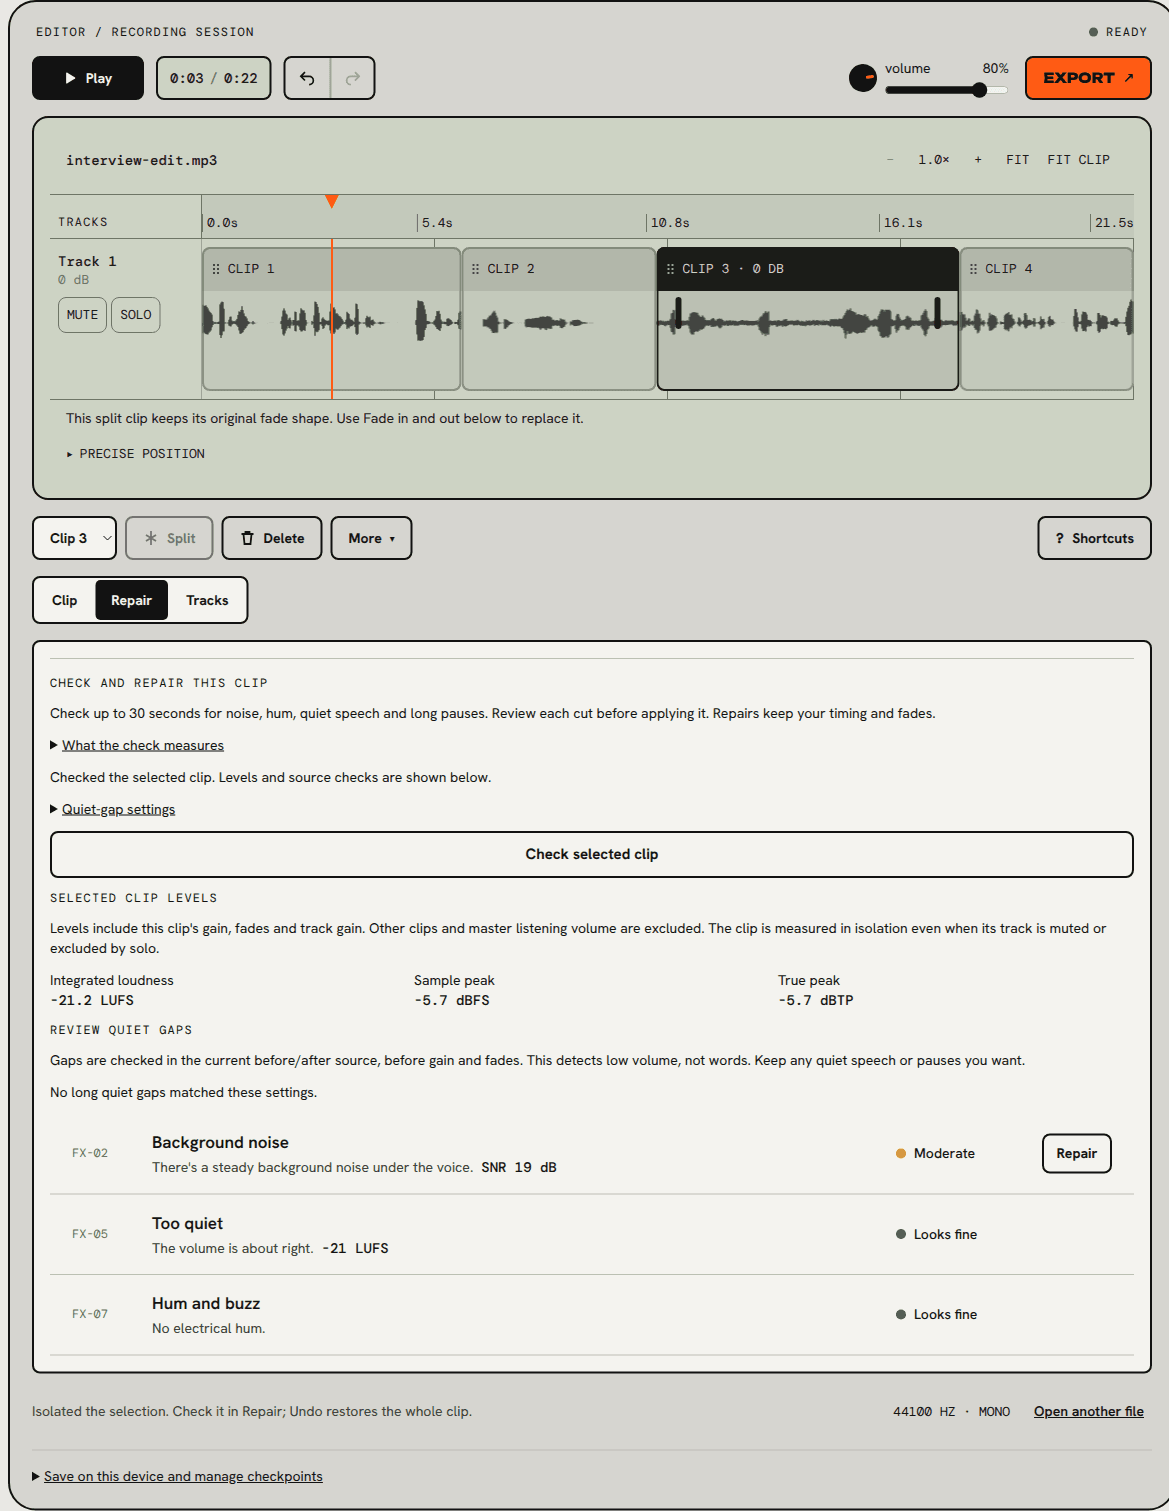
Repair isolates the selection as its own clip and opens the Repair tab. Press Check selected clip. Three checks run on your device and each one gives a sentence before a number: here the background noise check found a steady noise under the voice with a 19 dB signal-to-noise ratio and rated it Moderate. Level and hum were fine.
Press that Repair button. The noise repair runs on the clip, the check re-reads at 32 dB, and Before and After buttons appear so you can compare in place. Leave the Amount where the editor set it (80 percent) unless the After version sounds hollow or watery; if it does, lower it and compare again. What those artifacts sound like, and why less is often better, is in what noise reduction can and cannot remove.
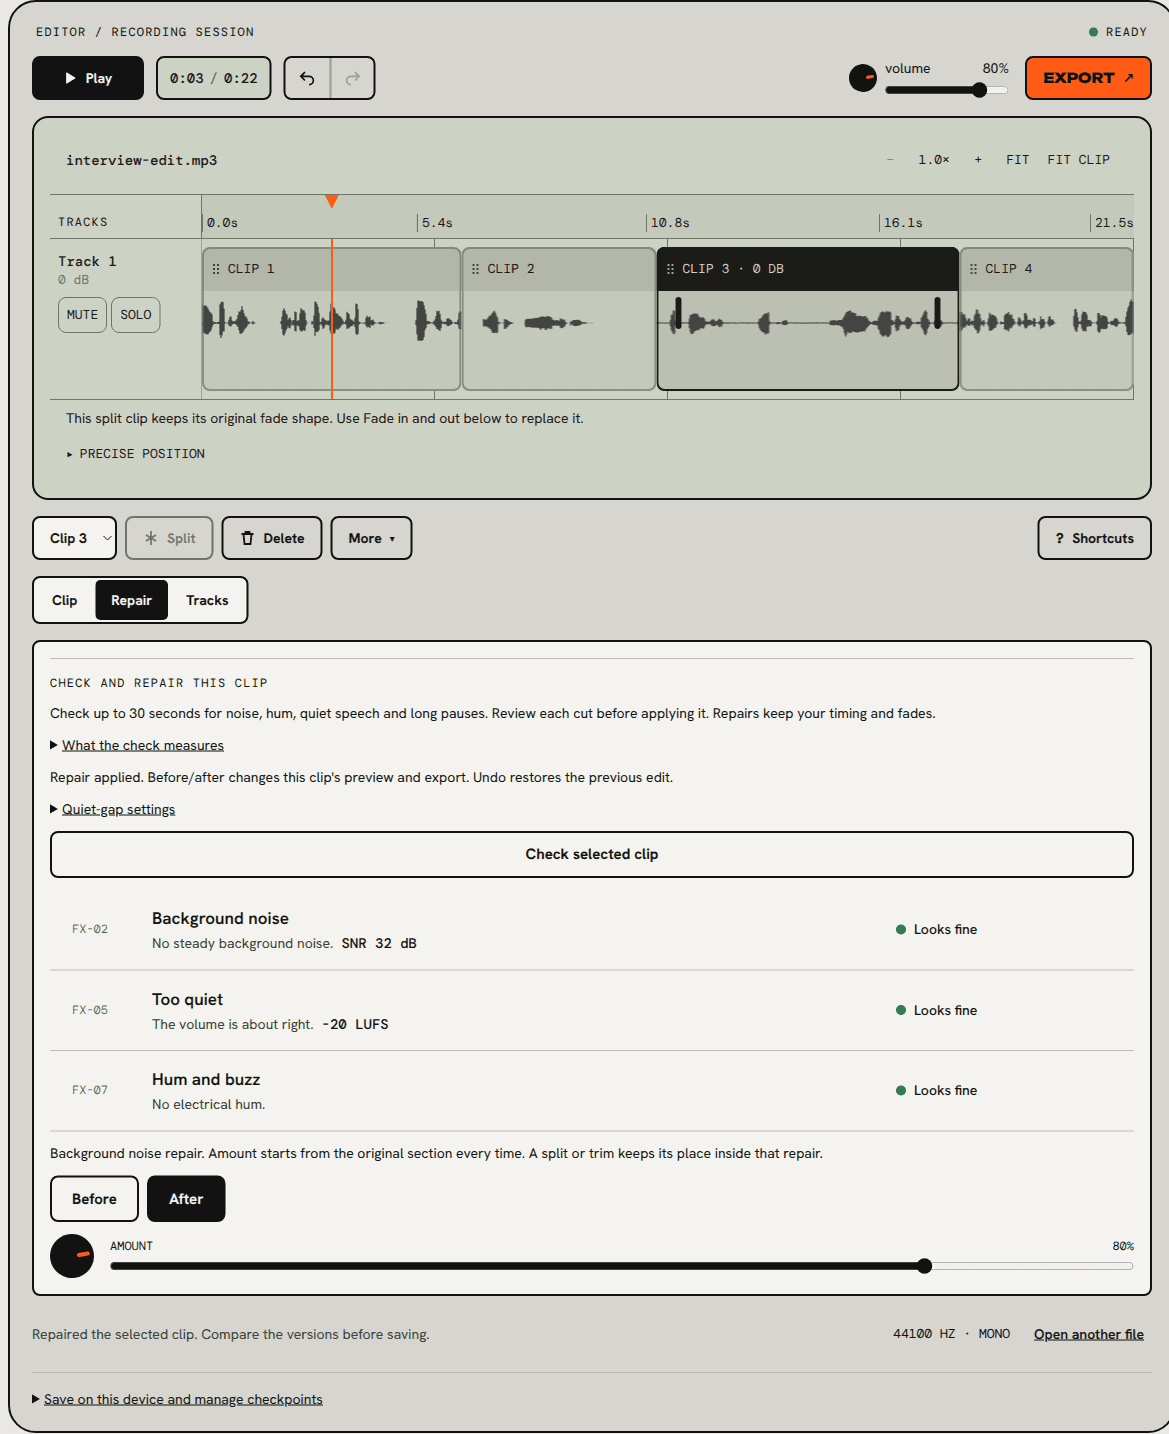
The repair stays inside the clip. A split or trim later keeps its place in that repair, and Undo removes it like any other edit.
Soften the follow-up and give it a little room
The host's follow-up is the last clip. Select it, open the Clip tab, then Exact clip controls. Open Fade in and out, type 0.15 for the fade in, and press Enter. The clip's waveform shows the fade handle at its start, and the summary row reads Fades 0.15 / 0.00 s.
Then open Move this clip and change Timeline start from 17.50 to 17.90. That adds 0.4 seconds of silence between the end of the repaired answer and the follow-up question, so the two voices do not collide. Moving a clip by typing a number is the same as dragging its header, with a value you can repeat.
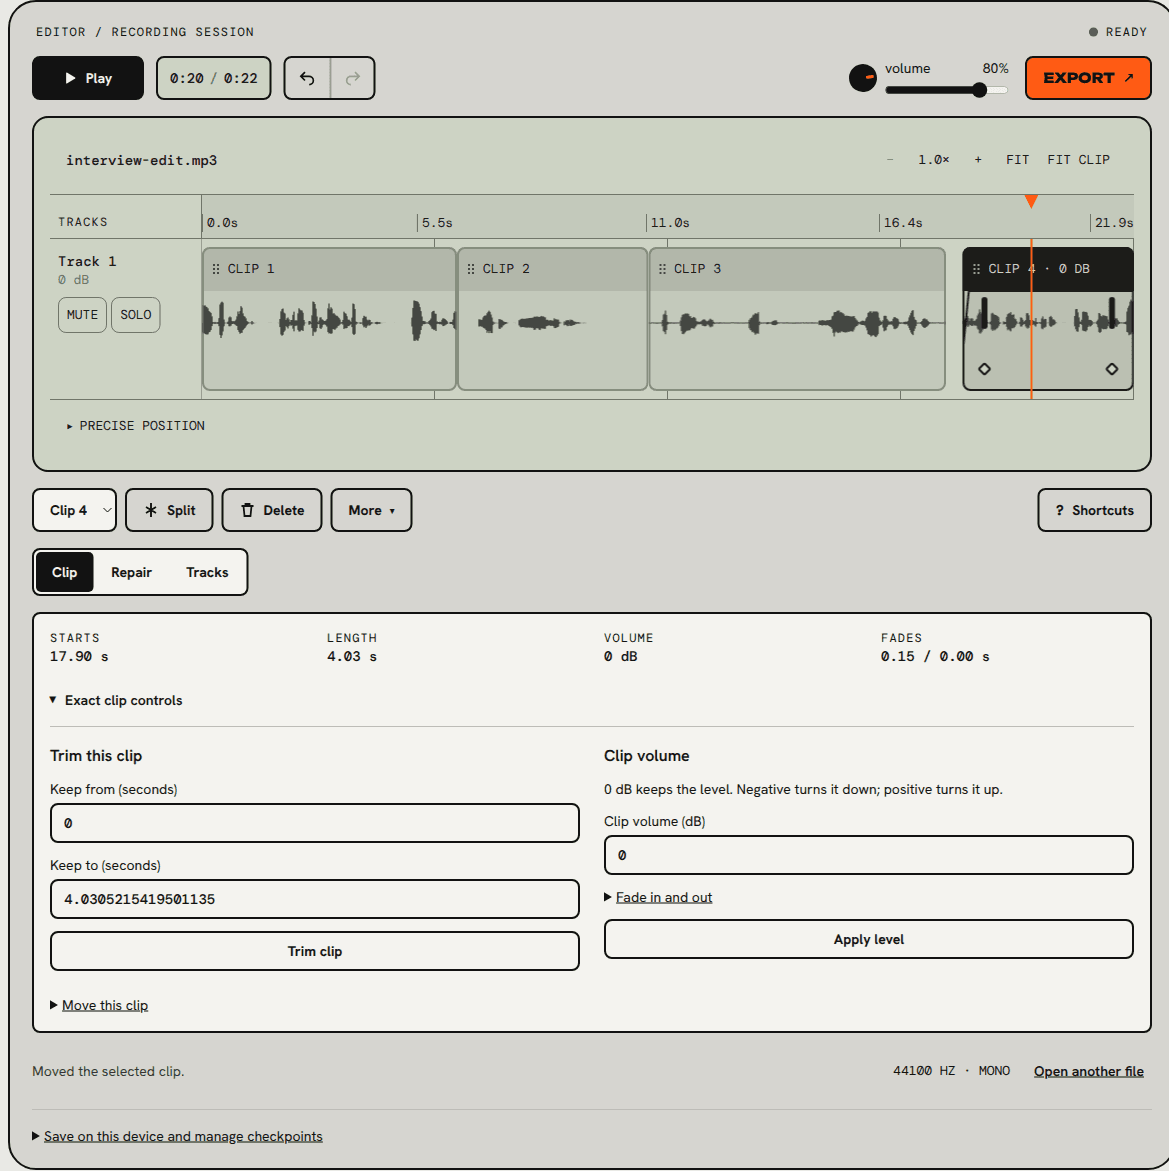
Clip volume lives in the same panel. We left it at 0 dB because the two voices were already matched; if one speaker is quieter, lower the louder clip rather than raising the quiet one, so you keep headroom.
The cut list
| Step | Edit | Result |
|---|---|---|
| 1 | Split 6.000 to 8.501, Delete, close gap | False start gone; project 0:25 to 0:22 |
| 2 | Delete range 6.000 to 7.500, close gap, Undo | Too abrupt; restored |
| 3 | Delete range 6.000 to 7.000, close gap | 0.5 s pause kept before the answer |
| 4 | Repair selection 10.501 to 17.501, noise repair | Noise check from SNR 19 dB to 32 dB |
| 5 | Fade in 0.15 s on the follow-up | Soft start on the last clip |
| 6 | Move the follow-up from 17.50 s to 17.90 s | 0.4 s of room before the host returns |
| 7 | Export MP3 | 21.97 s, mono, 44100 Hz, 192 kbps |
Four clips remain: the question (0.00 to 6.00 s), the start of the answer with its shortened pause (6.00 to 10.50 s), the repaired half of the answer (10.50 to 17.50 s) and the follow-up (17.90 to 21.93 s).
Check the level, then export
Before exporting, use the Repair tab's Check selected clip on the loudest clip and the quietest one. In this project both read about -21 LUFS, so no level change was needed. For a whole episode, run the export through the loudness meter afterward; we measured this export at -22.3 LUFS integrated, which is fine for a short web clip and a few dB under a typical podcast target. The podcast audio checklist has the targets.
Open Export in the transport bar and choose Download MP3 or Download WAV. The editor renders the whole timeline, including the repaired clip in its After state and the fades, and saves a file named after your original with -edited added. The status reads: Your edited copy is ready. Keep the original too. That last sentence matters. The editor never changes your source file, and keeping it means any cut can be revisited later.
MP3 at 192 kbps is right for a clip you will share directly. If this edit is one piece of a longer episode that will be processed again, export WAV so it is not encoded twice; WAV vs MP3 explains the trade.
Where this fits in the episode
This is the editing step of the podcast audio workflow: cuts, then selected repair, then a level check. For a full episode, the editor's limits matter: files under five minutes and 50 MB, up to four tracks, and repair on selections of up to 30 seconds at a time. Longer recordings go through the single-purpose tools, such as background noise repair for the whole file and the silence trimmer for pauses, with the editor for the detailed cuts in between.