Repair One Noisy Section Instead of the Whole Recording
When a fan, a buzz or a quiet answer affects only part of a recording, repair that part and leave the rest as recorded. What the editor does at the edges, when to use the whole-file fixer instead, and how to compare the result.
By the fix.fm team · Published · Updated
Most recordings are not broken everywhere
A file that needs repair usually needs it in one place. A fan starts halfway through an interview. A phone charger buzzes for two minutes of a one-hour call. One guest leans back and goes quiet for a single answer. Processing the whole file for one of these problems means processing the clean parts too, and every denoiser, hum filter or level boost has a cost somewhere, as why noise reduction makes a voice muffled or robotic explains.
Selection repair is the alternative. Mark the part of the recording that has the problem, repair that part, and leave everything else exactly as it was recorded. This article explains how that works in the free audio editor, what the editor does to the edges so the join is not audible, where the approach stops being the right one, and how to check the result.
What the editor can repair on a selection
The editor's Repair tab works on the clip you have selected, or on the part of a clip you have isolated with a selection. It runs three checks on that audio and offers a repair for each one that fails:
| Check | What it listens for | Repair |
|---|---|---|
| Background noise | Steady hiss or fan sound under the voice and in gaps | Neural noise reduction |
| Hum and buzz | A pitched electrical tone and its harmonics | Tuned hum filter |
| Too quiet | Integrated loudness far below the rest of the project | Linked compressor and limiter |
These are the same three repairs that the whole-file noise, hum and quiet-level fixers use. Echo, muffled sound, distortion, one-sided stereo and wind are not available on a selection yet. They still run on whole files in their own fixers, and the audio repair finder tells you which one you need.
A selection can be up to 30 seconds long. That is a deliberate limit: it keeps the repair fast enough to compare interactively on a laptop, and it keeps the operation inside the editor's memory budget. For a longer stretch, split it into pieces, or use the whole-file fixer.
Isolate the problem first
In the editor, drag across the waveform to select the noisy part, then press Split so that part becomes its own clip. The clip now has its own gain, fades and repair state, and the clean clips on either side are untouched.
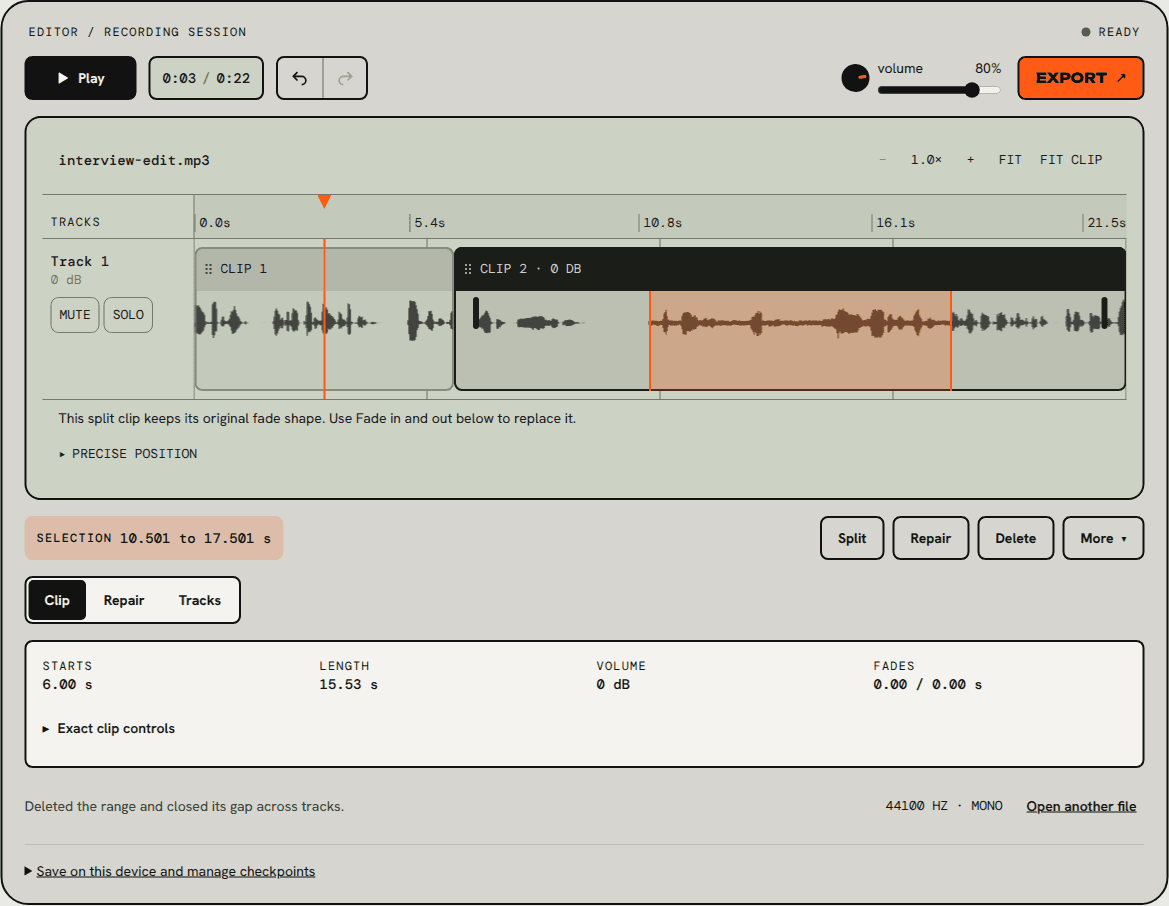
Be generous with the boundaries. Starting the selection a word early and ending it a word late costs nothing, because the repaired audio in those words will be nearly identical to the original. Starting it mid-syllable is what makes a join audible. If the problem starts in a pause, start the selection in that pause.
Run the checks, then repair only what failed
With the new clip selected, open Repair. Each check reports a plain sentence first, then the number behind it: an estimated signal-to-noise ratio for background noise, integrated loudness for level, and the detected hum frequency if there is one.
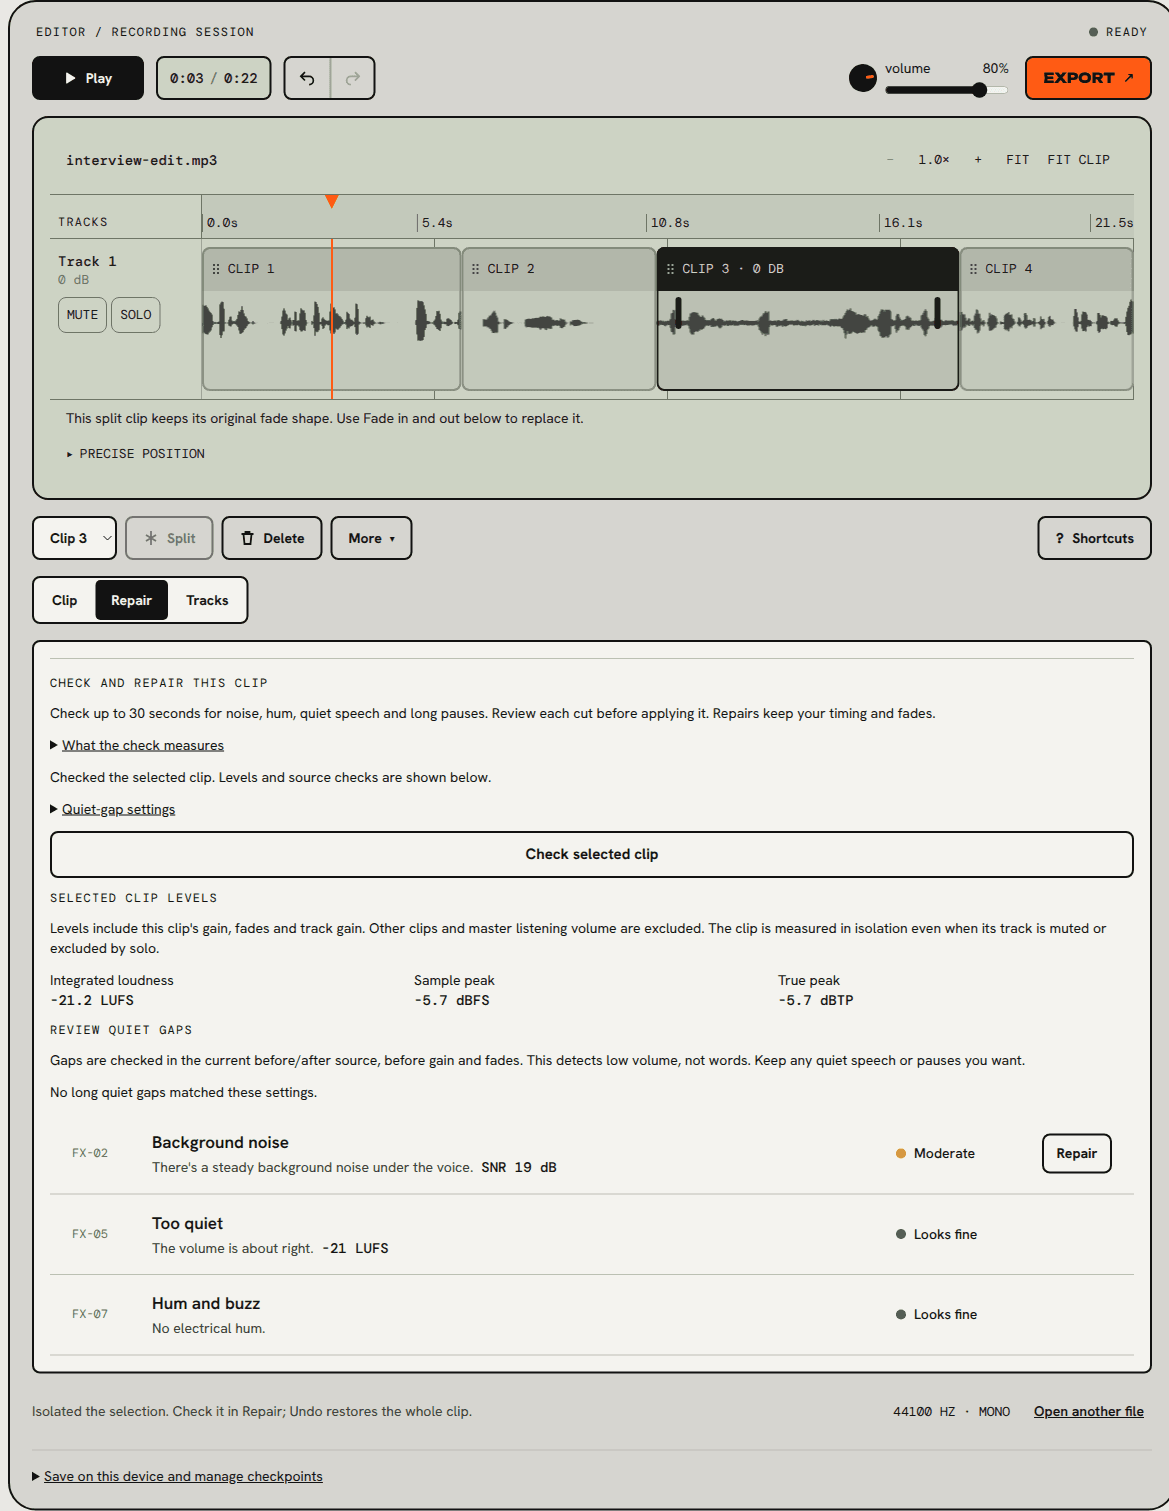
Press Repair on the failing check only. Running the hum filter on a clip with no hum, or boosting a clip that is already at level, changes the audio for no benefit. A check that reads "Looks fine" is a reason to stop, not a box to tick.
What happens at the edges
Two details make a selection repair sound like part of the recording rather than a patch dropped on top of it.
First, context. The noise repair reads one second of the original recording on each side of the selection so that its model of the noise is not learned from a cut edge. The hum repair reads six seconds, because a hum frequency estimate needs a longer window. That context always comes from the original source file, never from whatever clips happen to sit next to the selection on the timeline, so moving the clip later does not change the repair.
Second, the join. The repaired audio is cropped back to the exact selection, and the editor applies a 10 millisecond dry-to-wet ramp at each boundary. On a hiss repair that ramp is inaudible. On a hum repair in a quiet passage you may hear the buzz fade over that 10 ms rather than stop dead, which is the point: a hard switch would click.
The original audio is never rewritten. A repaired clip keeps a reference to both versions, and the Before and After buttons swap between them for playback and export alike. If you split or trim the repaired clip afterwards, both versions follow.
Compare, then adjust Amount
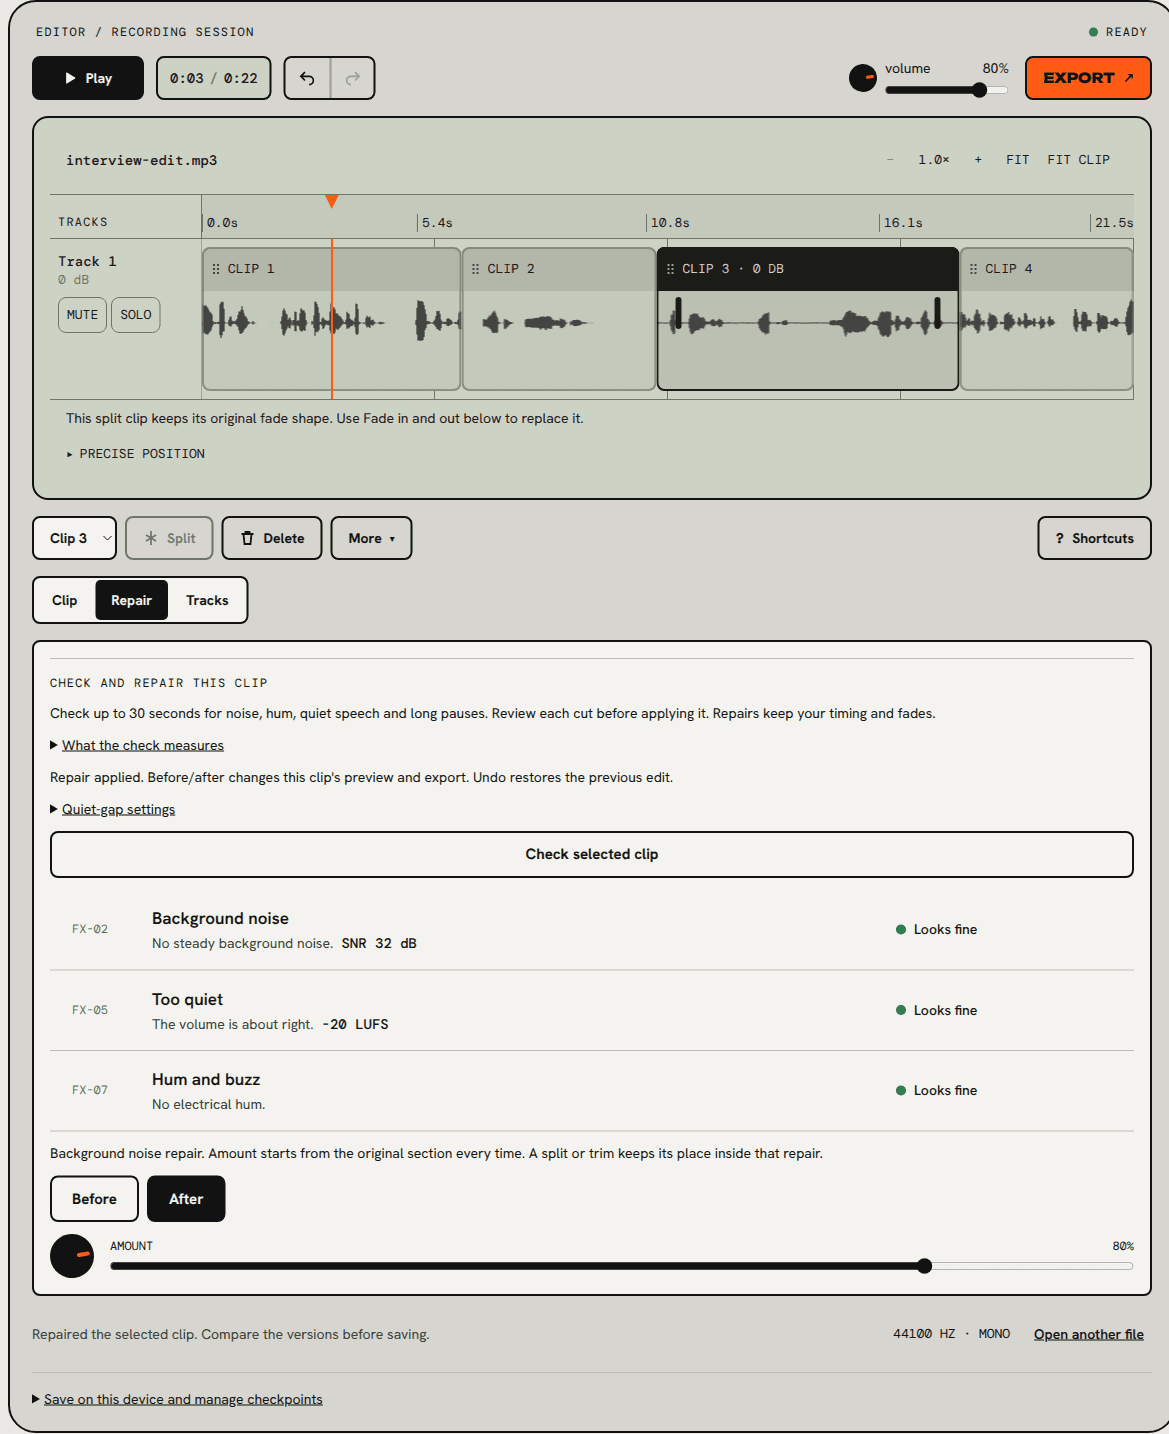
Play the join at normal volume, then play the middle of the repaired clip and toggle Before and After. Listen for three things, in this order: did the problem get smaller, are all the words still there, and does the speaker still sound like the same person as in the surrounding clean clips. That last comparison is one you only get with selection repair. When the whole file is processed there is no clean reference to compare against.
Amount starts at 80%. It is not a wet/dry fader applied after the fact; changing it reruns the repair on the original selection at the new strength, so 50% is a gentler repair, not a blend of a strong one. Lower it if consonants soften or breaths disappear. In the walkthrough above, 80% took the hiss from 19 dB to 32 dB SNR without an audible change to the voice, and we left it there.
Every step is undoable, including the repair itself. If the clip sounds worse, Undo removes it and the original clip comes back with its fades and position intact.
When to repair the whole file instead
Selection repair is the right tool when the problem is local. It is the wrong tool when the problem is everywhere, when it changes over time, or when it is not one of the three repairs above.
| Situation | Better choice |
|---|---|
| Hiss under the entire recording | Whole-file noise repair, once, then edit |
| Hum that comes and goes with a refrigerator | Repair each occurrence; the hum filter needs a steady tone |
| One speaker consistently quieter than the other | Track volume in the editor's Tracks tab, not a repair |
| A whole file that is too quiet | Loudness normalization, then check it on the LUFS meter |
| Room echo, wind, distortion or a muffled take | The whole-file fixer for that problem |
Repairing a hiss that runs under the whole file in ten separate selections gives you ten slightly different noise estimates and ten joins. One whole-file pass is cleaner. The reverse is also true: running a whole-file denoiser because two minutes of a two-hour recording have a fan in them processes 118 minutes that did not need it.
Check the finished edit as a whole
Once the repaired clip sounds right in place, listen to the whole piece from a few seconds before the join to a few seconds after the end of the repaired clip, at the volume a listener would use. Then check the finished export's level once, because a repair changes level slightly and a quiet-level repair changes it a lot. The LUFS meter reports integrated loudness and true peak for the whole file, and the podcast audio workflow places that check at the end, after the cuts and repairs are done.
For a complete worked example, editing an interview applies this exact repair in the middle of a cut list, with the exported before and after audio. Audacity's manual describes the same idea for its noise-profile tool in Noise Reduction: select the problem, not the file.